How to Install & Configure SickBeard
This tutorial shows step-by-step how to install and configure SickBeard PVR Downloader on an Ubuntu / Debian based system, and link it to SABnzbd+ in order to download TV programs from Usenet.
Use this tutorial in conjunction with my Youtube video: How to Install & Configure SickBeard
Installing SickBeard
Download Python Source from GitHub: https://github.com/midgetspy/Sick-Beard/archive/development.zip
Unzip the Source Code folder and copy it into your home folder, e.g: /home/user/SickBeard
If you‘re installing SickBeard into a remote system then SSH in via File Manager or WinSCP
AutoProcess TV Config
autoprocessTV.cfg file tells SABnzbd which IP and Port number SickBeard is running on.
cd ~/SickBeard/autoProcessTV
mv autoprocessTV.cfg.sample autoprocessTV.cfg
nano ~/SickBeard/autoProcessTV/autoprocessTV.cfg
#Make the following Changes:
[SickBeard]
host=localhost
port=4001
username=
password=
web_root=
ssl=0
Create SickBeard Init Script
cd ~
wget quidsup.net/sh/init-sickbeard.sh
nano init-sickbeard.sh
Make the changes detailed in SickBeard Init Script
sudo cp ~/init-sickbeard.sh /etc/init.d/
cd /etc/init.d
sudo mv init-sickbeard.sh sickbeard
sudo chmod 755 sickbeard
sudo update-rc.d sickbeard defaults
sudo service sickbeard start
The Init script opens SickBeard on system bootup, its written for Ubuntu / Debian based systems.
Remember to change the three Username variables (shown in this picture as /home/quids) to match your system.
Note: Don‘t run SickBeard as the Root user, as it will cause a severe security risk to your system.

Now to run SickBeard
If you are using SickBeard on the same computer you‘re currently using, then open your web browser and type in the following address: localhost:8081, or 127.0.0.1:8081
Alternatively, if SickBeard is on a different computer, then open your web browser and type in its Host name or IP address followed by :8081. E.g. nas.local:8081, or 192.168.0.10:8081
To start with it would be a good opportunity to run the first time updates for SickBeard.
Click the Update Now button at the top of the screen, and then wait for SickBeard to restart.
In future SickBeard will alert you when an update is required.

SickBeard Config > General
- Untick Launch Browser
- Set the Port Number
Change port to 4001, or any number of your choice.
Note: I recommend keeping the port number between 1024 to 30,000 - (Optional) Set Username and Password
If you want to restict access to SickBeard - Save changes, and then Restart SickBeard.
(Click on Home, and then Restart)

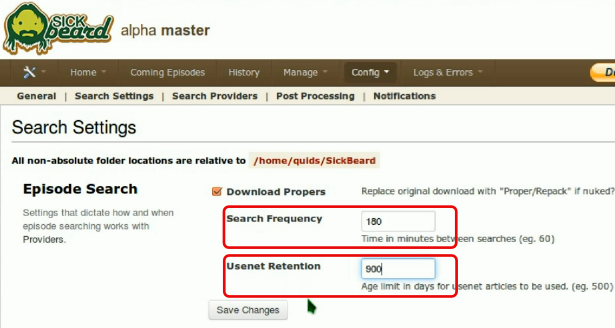
SickBeard Config > Search Settings
- Search Frequency
Change Search Frequency from 60 Minutes to something like 120 Minutes (2 hours), or 180 Minutes (3 hours) as there is need to hammer the NZB / Torrent searchers too often. - Usenet Retension
Set Usenet Retention to the number of days your Usenet provider retains files for, this is usually between 800 to about 2000 days. - Tick Search NZBs
- Set NZB Method to SABnzbd
- Provide SABnzbd URL
By default this is http://localhost:8080, but if you followed my tutorial on SABnzbd I changed the port to 4000: http://localhost:4000 - SABnzbd API Key
Copy and Paste this key from SABnzbd > Config > General > API Key - SABnzbd Category: tv
- Save Changes, and then you can try out the settings by clicking Test SABnzbd
SABnzbd Config > Folders
Post-Processing Scripts Folder:
Set Scripts folder to SickBeard Auto Process TV, e.g. /home/you/SickBeard/autoProcessTV
SABnzbd Config > Categories
Create new category for SickBeard Downloads
Category Name: tvPriority: DefaultProcessing: DefaultScript: sabToSickBeard.pyFolder/Path: e.g. /home/you/Videos/TV, or /mnt/raidmount/TVGroups: Leave blank
SickBeard Config > Search Providers
- Add new Custom Newznab Provider
You‘ll need to subscribe to an NZB Searcher website that supports use of RSS feeds and gives you an API key.
I use NZB.su - Site URL
Address of the NZB Searcher website - API Key:
Your RSS / API Key supplied by your NZB Searcher
SickBeard Config > Post Processing
- TV Download Dir - Leave Blank
- Keep Original Files - Untick
- Move Assoviated Files - Untick
- Rename Episodes - Yes Tick this box
- Scan and Process - Untick
- Name Pattern - Custom
Season %0S/%SN - S%0SE%0E - %EN - Multi-Episode Style - Repeat
Thats it, SickBeard is ready to use
